Bear Desert Island
November 16, 2010
How to Barefoot Water Ski

Barefoot water skiing is an exhilarating sport. If you enjoy watching others do it, why not try it for yourself? This water sport is not hard to learn. All you need is a lot of patience, discipline and presence of mind. It’s also important to wear the proper clothes and use the right equipment=.
What you will need:
- Barefoot wetsuit - This is a padded suit with built-in flotation so =you won’t need to wear a life jacket.
- Padded shorts - As a beginner, it’s advisable that you wear padded shorts to help you practice your starts and turns properly and safely. The more padding you have, the better.
- Boom - This is a pole that extends from the center to the side of the boat.
Steps:
- Have someone with you who is a barefoot water skier or somebody who knows how. It would be a lot of help to have somebody show and explain to you the proper way of doing it.
- For a beginner, start by using a boom instead of a towrope. It is easier to learn from a boom because it doesn’t swing like a rope does. It is something steady that you can hold onto when the boat starts to move.
- Do the tumble-up start.
- Enter the water and grab the boom with both hands.
- When you’re ready, signal the driver to start. The ideal speed depends on your weight. Divide your weight by 10 then add 20. When doing tumble-ups, the speed of the boat is a little slower than your required speed.
- When the boat moves forward, your legs will be dragged behind you.
- As the speed increases and you start to feel the water solid under you, turn your body to one side.
- Bend your knees. Swing your legs in front of you using the strength of your upper body and arms.
- Your butt is now sliding on the water and your feet in front of you.
- Gradually lower your feet, making sure that your heels touch the water first. Don’t lower your feet too quickly. The boat should be traveling at the right speed and the water should be hard enough before you set your feet down.
- Stand up carefully.
Tips:
- Practice as often as you can. Be patient and don’t expect to be able to perform the skills immediately.
- Having the right stance is the key. To prevent injuries, it’s important to know the proper position and do the proper body mechanics. Put more weight to your feet as the boat accelerates. When you’re standing up, make sure your knees are bent at the proper angle, arms forward, feet a few inches apart and your head up. Movements and changes in position should be done gradually and in proper timing.
- Wear a life jacket if you don’t have the kind of suit that has built-in flotation.
- When starting on a towrope, make sure there is no slack on the rope before letting the driver speed up.
- It is also good to have a spotter with you. A spotter will inform you of any obstacles in the water that you need to avoid.
Barefoot water skiing may be a risky sport. Remember to always consider your safety. Give yourself time to learn the basics. Do not attempt to perform stunts that you don’t have to skill level for.
How to Balance a Soccer Ball on Your Foot

When it comes to sports, soccer is perhaps among the most exciting, energy-filled and well-loved by people, adults and children alike. Known in England as football, this team sport involves two teams with 11 players each, aiming to kick a ball and pass it to each other, then finally putting it through a goal at the end of the playing field.
Soccer is exhilarating, but just like other outdoor sports, it requires discipline and control. If you’re a soccer player, the more control you have over your body and the ball, the more agile and successful athlete you will be. One way of enhancing your control is by learning how to balance a soccer ball on your foot. Even if you’re not a soccer player, knowing this trick will certainly impress other people.
What You’ll Need
- Soccer ball
- A flat surface, like a driveway or field.
- Shin guards (optional)
- Cleats (optional)
How To Do It
- Place the soccer ball in front of you, just at the base of your feet.
- Choose the foot where you’ll be balancing the ball. It’s better to use the foot you’re more comfortable with, or your dominant foot. This is the one you have more control with. If you’re able to master this with your dominant foot, you can use the other.
- Carefully roll the ball up on your foot, then place your foot loosely on top of the soccer ball. Pull your foot back quickly, to create a backspin. Move your foot simultaneously, so it’s under the ball.
- Create a little cradle in between your shin and your foot’s end, by arching your ankle upwards.
- Slowly raise your foot from the ground, carefully balancing the soccer ball in between the cradle you created.
- Extend your foot slowly, until it’s parallel to the ground again.
- Try to find a sense of balance using the ball of your foot. Hold it there as long as you can. You’ve now successfully balanced a soccer ball on your foot!
Tips To Remember
- It’s better to do this while you have your soccer cleats or your sneakers on, rather than doing it barefoot, or with your socks.
- Try balancing the ball with your foot against a wall first, if you’re having difficulty.
- Relax. Don’t lose hope if you don’t get it the first time, and don’t allow other people’s taunting to distract you. Letting others distract you only makes you lose your concentration.
- Always keep your eye on the ball.
- Don’t hold it for too long, or you might pull a muscle.
- If you succeed, try to do it twice in a row, then three times, then so on.
One of the keys to being a good soccer player is practicing proper balance, and mastering physical control. Learning how to balance a soccer ball on your foot is a good way to learn these disciplines. Try these tactics for yourself and see how good you do with this exercise.
How to Back Dive
 Eager to impress your friends while having fun in the pool? Regular, forward dives are very common, so if you want to try something unique, you can do a back dive instead. It’s quite easy, as long as you know the proper way how.
What You’ll Need:
- Swimming pool
- Pool ladder
- Diving board
- Swimming trunks
- Spotter
Procedure:
- Practice first. If you don’t know how to do the forward dive, master it first. It’s easier to do the back dive if you’re familiar with this easier diving stance. Do a few forward dives. Afterwards, stretch out with a few bridges. You do this by lying on your back, then pushing up with your hands, so your back is arched.
- Familiarize yourself with the backbend first. What you do when you backbend is the same thing when you back dive, except you do it on land, without falling off a diving board or bouncing.
- Practice back diving with the pool ladder first. Begin at the bottom rung, then slowly work your way up. Once you’ve executed a few good ladder dives, you can move to the diving board.
- Go to the diving board’s end, allowing your heels to hang over the side. Keep your balance on the balls of your feet, going on tip toes.
- Slowly and carefully arch your back, as you do when you back bend. As you begin to fall, throw yourself off the diving board.
- Your hands must be the ones that hit the water first. Make sure your toes are pointed properly.
- Try doing this a few more times, going quicker and quicker with every repeat. You can add a bounce once you’re ready: go to the end of the diving board, swing your arms, then jump once, going into a back dive.
Some Tips:
- Don’t dive in shallow water. The pool must be at least eight feet when you do this trick.
- Ask a friend to be a spotter. He or she will make sure you don’t hit the board.
- Don’t dive while wearing goggles. It can snap and hurt you badly because of the impact from the water.
- When you back dive, you shouldn’t throw yourself way out, but you also shouldn’t fall down straight. Try going 1 1/2 feet from the board.
- Be confident. If you believe you can do it, you can.
Have a splashing good time with this new diving technique. Your friends will surely explode into applause as you perform a perfect back dive.
How to Arm Wrestle

In the movie “Over the Top,” Lincoln Hawk (played by Sylvester Stallone) fought for the love of his son by competing in spectacular competitive arm wrestling tournaments. While you don’t have to lay your life on the line for anything like Lincoln Hawk did, arm wrestling is still a contest of pride, skill, and strength. If you want to be on your way to becoming a champion arm wrestler, here are some tips and tricks to keep in mind.
Rules of Arm Wrestling
Arm wrestling is a test of upper body strength. The goal of the game is to knock or pin down the opponent’s arm on the table or playing surface. To get the win, an arm wrestler must bend the arm either at the elbow or at the shoulder with enough force for the arm to be knocked down.
Starting Position
- The players face each other and lay an arm on the table. Competitors with the same lead arm often face each other, although there have been arm wrestling matches contested between a right-armed player and a left-armed player.
- Both players lay their elbows on the table, with their forearms pointing forward and outstretched.
- The players clasp both hands and the referee or spotter locks them in tight to ensure fair play.
- When the bell sounds or the referee gives the signal, the competitors try to knock down the arm and hand of their opponent down.
Winning the Match
There are two ways to win an arm wrestling match:
- Knockdowns happen when the winner knocks down the forearm of the opponent to the surface. Some rules may state that the contestant should pin the opponent’s arm down the table for at least a count of three.
- Referee’s calls may stop the match if a contestant’s arm is bent or contorted in such a way that continuing the game may result in a serious arm injury, like a dislocation or a fracture.
Arm Wrestling Tips
Arm wrestling is all about strength, but you don’t need the most powerful arms in the world to win an arm wrestling contest. Here are some ways to win arm wrestling bouts without breaking a sweat.
- Use leverage to your advantage. You do need powerful arms to win an arm wrestling contest, but leverage is very important to add more stability and increase power. Keep a stable stance, keep your hand on the grip pole or the side of the table, and use your body to give your wrestling arm the torque and power needed to knock your opponent’s arm down.
- Mind games. An intimidating stare, a few pulses of your fist, and some gritty expressions can weaken the resolve of your opponent. Just remember to play fair, and don’t go so far as to insult your opponent.
Arm wrestling does not have to be as dramatic as in the movies. With these tips, you can go over the top with just about anybody who lays a hand on your table, and demands a fight to the finish… or just for 15 seconds, at least.
How to Apply a Sleeper Hold
 If you watch mixed martial arts (MMA) bouts or professional wrestling matches, you may hear the announcer call many chokes and submission moves as “sleeper holds.” The sleeper hold stays true to its name: it forces the opponent to be knocked out, as if he or she slowly falls asleep. Here are ways to help you learn how to perform these basic wrestling maneuvers.
What is a Sleeper Hold?
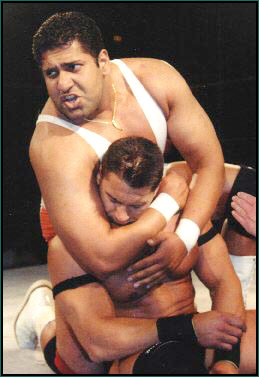
Sleeper holds are a group of wrestling and martial arts maneuvers that are applied from the back of an opponent. The goal of a sleeper is to focus the attack on certain veins and arteries on the neck area to force a submission or a knockout. While the move is meant to look dangerous in professional wrestling, very little pressure is applied when a sleeper is executed. In combat sports, however, the danger of sleeper holds is very real, and may cause serious injury when applied improperly.
There are three kinds of sleeper holds:
- The catch sleeper is the sleeper hold used in many professional wrestling matches, although it is also used in MMA.
- The choke sleeper is also known as the rear naked choke (RNC), and is a very common sleeper hold used in MMA. The popularity of the choke sleeper in MMA has also made it a popular submission hold in professional wrestling.
- The inverted sleeper is called a “Dragon Sleeper” in professional wrestling, and is a popular part of the move set of wrestlers who specialize in submission-style wrestling.
Applying a Catch Sleeper
The catch sleeper is a popular counter for running opponents, and was once used as a very effective submission hold in the early days of professional wrestling. The catch sleeper applies pressure on the jugular vein in the neck, while applying pressure on the veins on the temple. To apply the catch sleeper, follow these steps:
- Get behind the opponent.
- Wrap your right arm around the neck of the opponent.
- Grab the left shoulder of your opponent, and encircle your forearm over his or her forehead.
- Apply the pressure needed for your opponent to tap out.
Applying a Choke Sleeper
The choke sleeper, or RNC, is a popular maneuver in MMA, and has forced many fighters to tap out because of its quickness and effectiveness. The RNC applies pressure on the carotid arteries, restricting the flow of blood to the brain. To apply the choke sleeper, follow these steps:
- Get behind the opponent.
- Wrap your left arm around the neck of the opponent.
- Grab the biceps of your right arm, and place your right forearm on the back of the opponent. Your arms should now resemble a figure-four around the head of your opponent.
- Apply the pressure needed for your opponent to submit.
Applying an Inverted Sleeper
The inverted sleeper, also known as the dragon sleeper, is a popular finisher that restricts the airway of the opponent, and applies pressure to the veins of the neck. To apply an inverted sleeper, follow these steps:
- Get behind the opponent.
- With the opponent’s face up, tuck his or her head underneath your arm. Hook his or her near arm with your free arm to minimize the chances of a counter.
- Kneel and pull back with your shoulders to apply pressure. You can also force the opponent downward as you apply a body scissors to apply maximum pressure.
Like any submission hold or choke hold, sleeper holds are particularly dangerous and can cause serious injuries when executed improperly. Do not attempt to execute any sleeper hold if you do not have the training or skills needed to apply a proper sleeper hold.
How to Apply a Sleeper Hold
If you watch mixed martial arts (MMA) bouts or professional wrestling matches, you may hear the announcer call many chokes and submission moves as “sleeper holds.” The sleeper hold stays true to its name: it forces the opponent to be knocked out, as if he or she slowly falls asleep. Here are ways to help you learn how to perform these basic wrestling maneuvers.What is a Sleeper Hold?
Sleeper holds are a group of wrestling and martial arts maneuvers that are applied from the back of an opponent. The goal of a sleeper is to focus the attack on certain veins and arteries on the neck area to force a submission or a knockout. While the move is meant to look dangerous in professional wrestling, very little pressure is applied when a sleeper is executed. In combat sports, however, the danger of sleeper holds is very real, and may cause serious injury when applied improperly.
There are three kinds of sleeper holds:
- The catch sleeper is the sleeper hold used in many professional wrestling matches, although it is also used in MMA.
- The choke sleeper is also known as the rear naked choke (RNC), and is a very common sleeper hold used in MMA. The popularity of the choke sleeper in MMA has also made it a popular submission hold in professional wrestling.
- The inverted sleeper is called a “Dragon Sleeper” in professional wrestling, and is a popular part of the move set of wrestlers who specialize in submission-style wrestling.
Applying a Catch Sleeper
The catch sleeper is a popular counter for running opponents, and was once used as a very effective submission hold in the early days of professional wrestling. The catch sleeper applies pressure on the jugular vein in the neck, while applying pressure on the veins on the temple. To apply the catch sleeper, follow these steps:
- Get behind the opponent.
- Wrap your right arm around the neck of the opponent.
- Grab the left shoulder of your opponent, and encircle your forearm over his or her forehead.
- Apply the pressure needed for your opponent to tap out.
Applying a Choke Sleeper
The choke sleeper, or RNC, is a popular maneuver in MMA, and has forced many fighters to tap out because of its quickness and effectiveness. The RNC applies pressure on the carotid arteries, restricting the flow of blood to the brain. To apply the choke sleeper, follow these steps:
- Get behind the opponent.
- Wrap your left arm around the neck of the opponent.
- Grab the biceps of your right arm, and place your right forearm on the back of the opponent. Your arms should now resemble a figure-four around the head of your opponent.
- Apply the pressure needed for your opponent to submit.
Applying an Inverted Sleeper
The inverted sleeper, also known as the dragon sleeper, is a popular finisher that restricts the airway of the opponent, and applies pressure to the veins of the neck. To apply an inverted sleeper, follow these steps:
- Get behind the opponent.
- With the opponent’s face up, tuck his or her head underneath your arm. Hook his or her near arm with your free arm to minimize the chances of a counter.
- Kneel and pull back with your shoulders to apply pressure. You can also force the opponent downward as you apply a body scissors to apply maximum pressure.
Like any submission hold or choke hold, sleeper holds are particularly dangerous and can cause serious injuries when executed improperly. Do not attempt to execute any sleeper hold if you do not have the training or skills needed to apply a proper sleeper hold.
Subscribe to:
Comments (Atom)
More Interesting Blogs!
|
|
 |
 |
||
|
|
|
|

